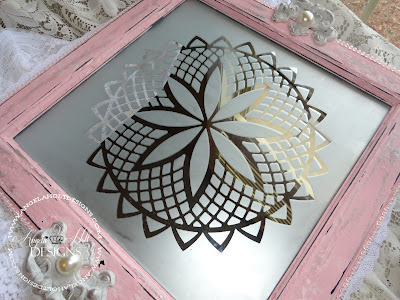
As a professional crafter educator and designer I given the most amazing opportunities to work with fellow companies and thier projects. To bring my innovative ideas to the table and to you in your craft rooms.
I will be working with Etchall; a surface etching cream for a few weeks that will bring out the most beautiful projects by using the basic of instructions.Today I want to share with you my " Shabby Chic Etched Glass Tray" with you and tell you how a came about to the finial project.
So come set a spell and indulge yourself into some creativity!!!
Step 1. Is to find you a mirror with a simple frame. As many of you know I hit the yard sales and the Goodwill to find my pieces most of the time and that is where I found my piece!!!
Step3. I wanted to add texture to my frame. While un-packing I found some sidewalk chalk and I hammered it into a powered form. There were still small chunks and I wanted that texture. I thin added white acrylic white paint and made a chunky chalk paint and then painted the frame.
Step 4. I knew I wanted to bring out the black frame some so I did so by sanding off some of the paint on all edges.
Step 5. I returned the mirror back into the frame after I did the etching process. This Doily pattern can be found on your Silhouette Studio Program. This images was created by "doily pointed net lace by Samantha Walker ", For more ideas and inspiration and for information on obtaining limited commercial licenses for crafters on Samantha's silhouette designs please visit: www.samanthawalkerdesigns.net and www.facebook.com/samanthawalkerdesigns.
Now to see how the etching process using the Etchall Cream is done by me using another fabulous Silhouette Design "life is better when you're laughing - vinyl phrase by Kolette Hall " Please watch my you tube video by CLICKING HERE Please visit Kolette's Blog for more inspiration too!!
Step 6: I know many of us have seen these old dress drawer handles from time to time, Well I kept all my old ones for later use and they were perfect for the handles of the tray!!! I simply painted them with Gesso and attached them to the tray using hot glue or you can also use your E6000 Glue too!
Further NOTE: To spice up the handle, I used some of my RANGER Silver Ink Dabber to add a finished touch, If you are wondering where I got that HUGE yummy pearl, look no further!!! This pearl is about the size of a quarter and can be purchased through Miriam's Crafting Supplies.
Step 7. Is adding the finishing touches!!! The Feet are made simply from using Smoothfoam ( the Crafter's Foam) balls. They make the perfect soft feet for any projects and they can be painted and designed to match your project. I added lace trim and pearls along the edges of the tray to finish it off.
And that is it my fellow crafters. I revamped mirror made into a Shabby Chic Tray using some awesome products and tools!!! Check out below to more detailed photos.
Be sure to share and like my fan page and more!!!
Your crafting Educator
Angela Holt


Wow!! This is Gorgeous!!
ReplyDeleteYou're so crafty! I absolutely love this Ang!!
ReplyDeleteAngela:
ReplyDeleteI really like the way you destressed the wood to make it like something out of my grandmother's attic....kudos! It pleases me no end to see your ideas using etchall. I cannot wait to see what you design with the etchall dip 'n etch. Thanks again.....Barbee......<{{}}><
Thank you Barbee!!! I would love to chat with you more could you please shoot me an email!! thealteredpage@yahoo.com
Delete