Showing posts with label xyron. Show all posts

Monday, November 17, 2014

Xyron 30 Days of Holidays Blog Hop

 It's that time of year!!!! Yep that time to bring out all the Glitter and paper and make Magic!!! The Xyron Designer and I are hosting 30 days of Holidays projects that will inspire you to create many new and exciting projects. Below I have in store for you a cute and Illuminating Christmas Ornament that will surly be the Star ( no pun intended) of the Tree. Featuring a Design from Silhouette America, I show you in this Video tutorial, how to assemble the box using my favorite Xyron Tool the Mega Runner. So be sure to follow the link to Xyron Facebook Page to STAY UP TO DATE with Daily inspiration and to BEGIN THE HOP!!!!

Thanks so much for stopping by to watch another Fab tutorial and for being a fan of my work!!!

Xyron Designer
Angela Holt
www.angelaholtdesigns.com

Watch video and Be sure to LIKE SHARE AND SUBSCRIBE!!! 


Saturday, October 4, 2014

Spellbinder and Xyron Design Team Project.

Hey Crafty Peeps!!! Cool air has rushed in here in Tennessee. The smells of Tobacco Barns and the vibrant colors of mums and pumpkins decorate the scenery. This has put me in the Fallish mood to bring to you a fabulous Card tutorial Using dies from Spellbinders and of course my Favorite Adhesive Xyon!! Below is a Step out tutorial I have created for you to show you how the process of this card came about. So come set a spell get warm and get inspired!!!

Supplies:
Spellbinders Nestabilities Majectic Squares
Xyron Creatopia Shapez Die By Spellbinders
Xyron Create Sticker Max
Xyron Create a Sticker 3"
Cardstock
Glitter
Pop Dot
Ribbon
Vintage Photo which is provided below!


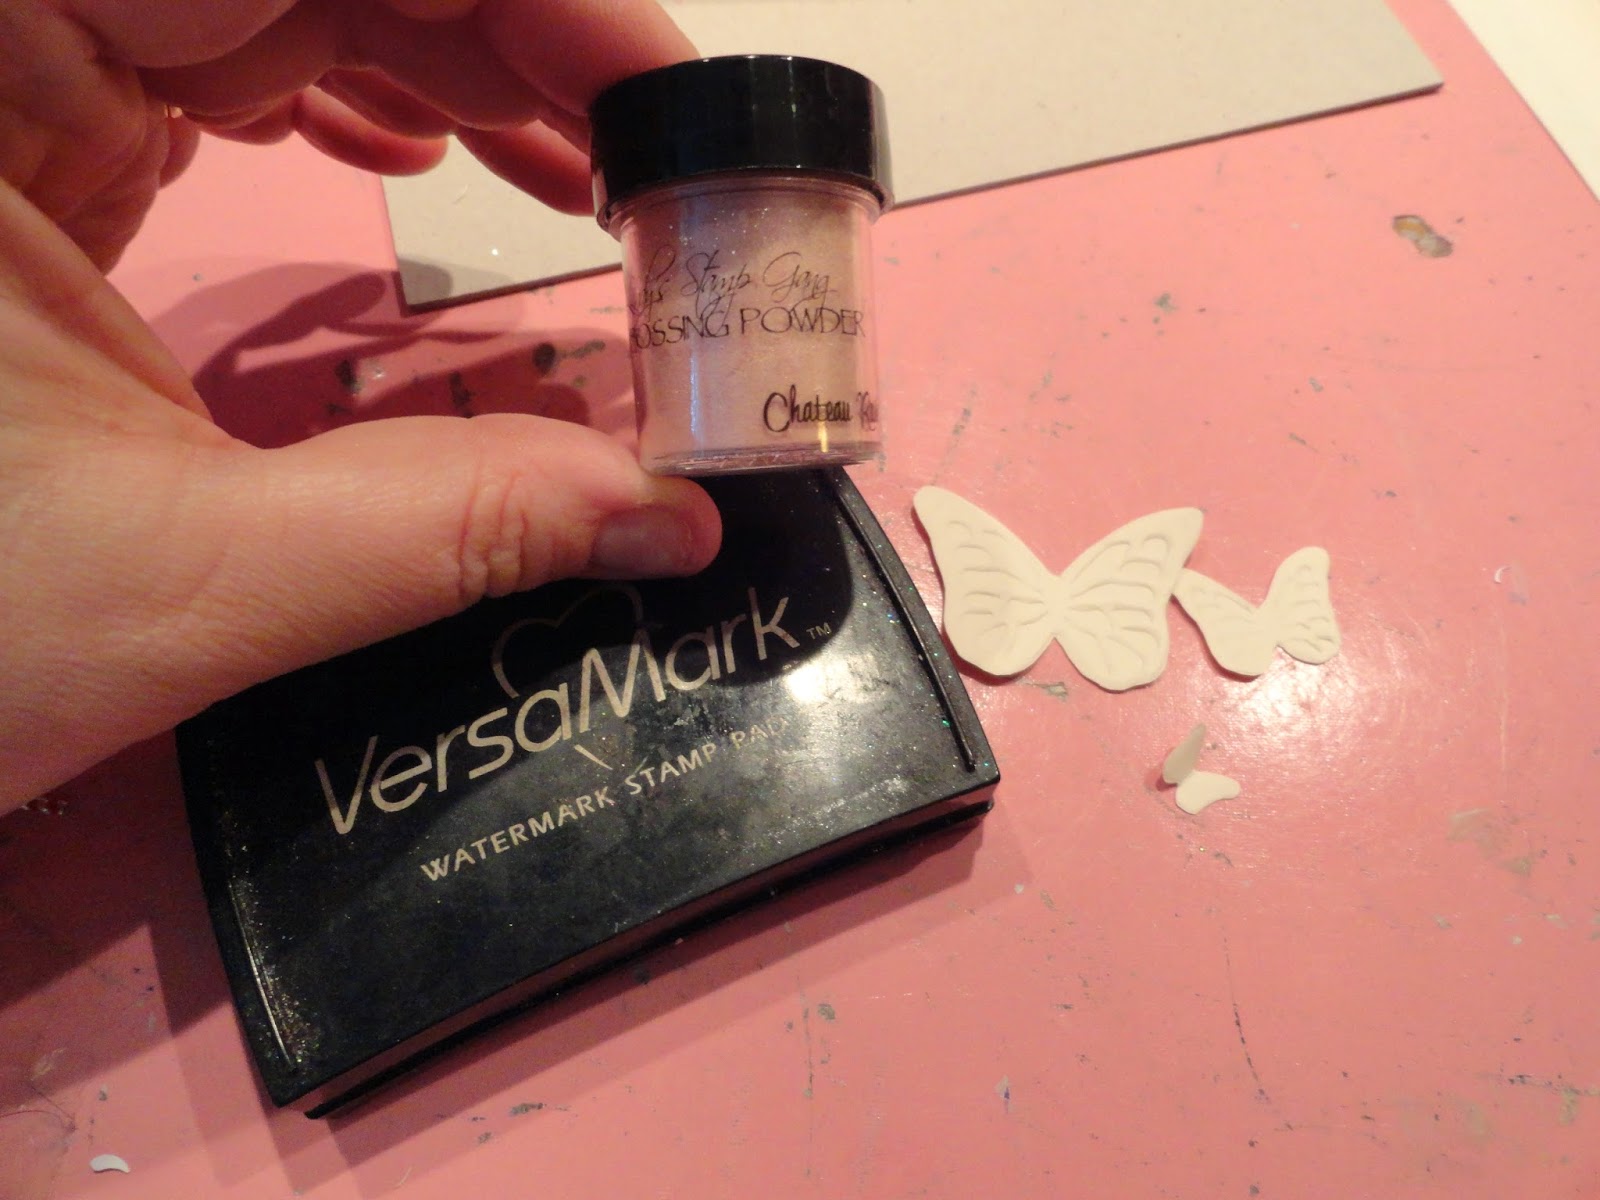
Step 1 As you see in the photos above. You are going to prepare your image and your frame for the image. For the Frame I cut it out with black cardstock. Ran it through my Xyron Sticker Maker 3" then I added Black Glitter then I ran it back through so I could make it a sticker to be placed around the photo. To prep my photo I ran it through the same Sticker Maker and placed it on a piece of Chipboard for added strength. The Frame is from the Xyron Creatopia Shapez Die By Spellbinders


Step 2: you will cut out 3 styles of paper. From the photo above, I used a base cardstock, the corrugated piece and a pattern piece. They all measure. Base Card is 5 1/2 x 5 1/2  the Corrugated is 5 1/8 x 5 1/8 pattern piece 4 3/4 x 4 3/4. Run the Corrugated piece through the Xyron Create a Sticker Max.


Step 3: While the corrugated piece is still on the sticker paper, Use the cool NEW tool set from Core'dinations called Sand it Set and make the edges rough and torn.


Step 4: Cut out from using the 
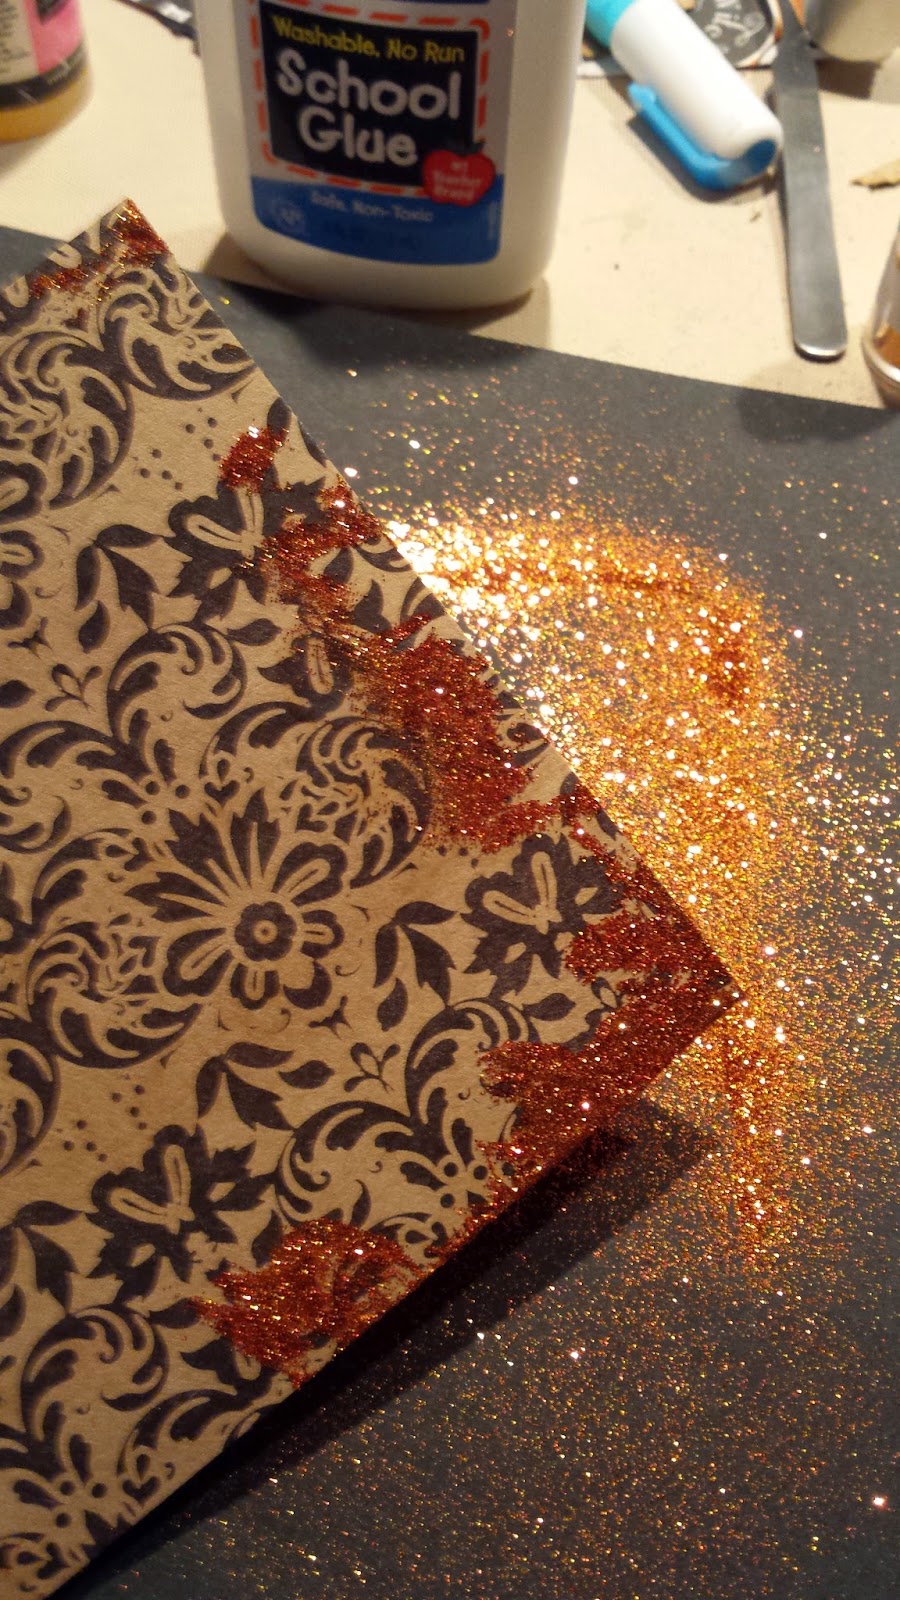
Spellbinders Majestic Squares dies  in black cardstock. I used Silver Rub n Buff to give a old look. Pop Dot your photo onto this piece. and begin layering and added embellishements!! As see above I used Orange Glitter to bring out the Pattern Piece and to give the card more sparkle! Dont forget to run the pattern piece that is now glittered through your Xyron Create a Sticker Max to make it easy to peel and stick to build the card. SEE PHOTOS BELOW!!


The Haunted photo I used:


I want to wish you a fabulous HAPPY HALLOWEEN!!! I hope this card has given your inspiration to create some awesome and festive cards for all your friends this season!! Please be sure to comment below and let me know what you think!!! Again thank you for stopping by for another fabulous creation,

Your Professional Crafting Educator/Designer

Angela Holt


Thursday, August 21, 2014

Perfect Paper Crafting/Xyron Blog Hop


Hey Crafty Peeps!!! Yep I'm Back for another fabulous 6 months of Awesome projects to share with you!! This week I had the pleasure to work with my most Favorite adhesive XYRON and a awesome tool by Perfect Paper Crafting called the Perfect Airbrush! It is a no fuss approach to turning your markers into a Airbrush!! I was oober excited to work with this tool. Below is a quick mini tutorial showing what I did and how I used my Tim Holtz Markers to create this amazing FALL card!!! Before you scroll down be sure that you have begun the BLOG HOP by visiting the XYRON BLOG each day this week!!

BEGIN BLOG HOP HERE: http://aintshecrafty.blogspot.com/


Step 1: I found a free clipart image and or you can use a stamp of a tree with some leaves. I then pulled out some Fallish colors in my Tim Holtz Markers and began to play with the Perfect Airbrush. I began manually airbrushing different colors on the tree to give it that multicolored Fallish look!


Step 2: Using one of my Favorite XYRON 5" Creative Sticker Max I inked the edges of my design and ran it through to create a sticker.


Step 3: I did the same with the other elements of the card to create stickers and I used my XYRON 9" Creative Station to do so!! When you make everything into a sticker it makes is so easy to create. The adhesive is even strong enough to stick to burlap as you see below!!! Yep you can run the burlap through too!!! UMM YES!!!!


Step 4: Adding the few perfect touches of Twine and Burlap made this card perfect for FALL!! I added some Sticker letters and I was done!!!


Be sure to Hop along and gather tons of inspiration using the Perfect Airbrush tool by Perfect Paper Crafting and don't forget to sang you some XYRON products too!!! Visit the links and the blog and tell them I sent you!!! I look forward to bringing you tons of creative projects and inspiration!!! The Holidays are coming and I know it will be a blast!!!

Creative Hugs

Your Professional Crafting Designer/Educator

Angela Holt

Tuesday, July 22, 2014

3Birds/HSN promotion

Woo Hoo I'm oober excited!!! It is an amazing 24 hour Craft celebration over at HSN!!! It is an all day event that is jammed packed with amazing products to make your crafting easy, beautiful and master pieces.!!

3Birds and Xyron will be on 24-Hour Craft Day on HSN Today so be sure to check out the NEW and amazing Products they will be showcasing. You can order the featured products in this event by visiting the HSN website!! Here are some quick links:

3 Birds Studios: ORDER HERE
Xyron: ORDER HERE

Here is my project that I created using 3 Birds products and Xyron Products!!! ALSO>>>>>>>
THIS LAYOUT WILL BE LIVE ON HSN!!! SO BE SURE TO CHECK IT OUT!!! 

Products Used:

Prima Marketing Chalk Edger in Colors "Old Rose, Cold Ice, and Moss Lawn. Order the 40 count Prima chalk edger Set through me at my store for an amazing unbeatable price!!! ORDER HERE
Various Flowers, laces and trims
Pop Dots
Hot Glue


This beautiful Baby is of my Friend Stephanie Nash. She is like a sister to me and we are life long friends and crafters!!! I thought this 3 Birds collection brought out the color blocked photo I created on my Adobe Photoshop Elements Program. 

Be sure while your watching to look for these cards I created using Xyron products such as the Xyron Mega Runner and the Creative Station I mentioned above!!! These are amazing products and must haves in your crafting tools!!


Thanks for stopping by!!! So grab you favorite drink and snacks and settle in for an amazing Creative craft event. If you cant be there, be sure to set the recording!!!! 

Your Professional Crafting Designer/Educator
Angela Holt
www.angelaholtdesigns.com 

Wednesday, July 16, 2014

Simple Stories/May Arts/ Xyron Blog Hop!!!

Hello Crafty Peeps!!! Xyron Designers and I have some amazing projects up for in this blog Hop!!! We are working with Simple Stories and May Arts with Xyron of Course and I have to say this is like a huge party of crafty goodness working with ALL 3 together!!! Ummm Yes!!! Be sure to visit http://aintshecrafty.blogspot.com/  So that you can see all the amazing projects for fellow Xyron Designers!!

I made a fabulous yummy layout with my goodies!!! I used Simple Stores "Story of Us" collection and May Arts 3mm Diamond Chain in Black and Paper Raffia Ribbon 

The Xyron tool I used were my Mega Runner and one of my Faves the Create a Sticker Max.

I love using the sticker max for my photos!!! 


Here is the layout I did using photos of me and my husband!!!

 The Gold Paint you see here is by Art Anthology and it is a Sorbet called "Satin Sheen gold"


 I used Art Anthology's White Gesso on some of the flowers and sprayed the flowers with Lindy's Stamp Gang "California Poppy Gold".


 Here you see the May Arts Black Diamond Trim and the Yellow Raffia that I used in a circle around our picture!!


The Simple Stories "Story of Us Collection" Had the perfect sentiment stickers that just spoke perfect for our photos!! This is also a fabulous collection for Newly Wed's.


I hope this has inspired to mix and play with many different mediums and products!! Always remember that Xyron is perfect adhesive to bring out your wonderful designs!! they have the perfect tools for every craft need!!

Be sure to visit the other designers blogs for even more inspiration using Simple Stories, Xyron and May Arts!!! The ideas are endless.

Thanks for stopping By!!!

Your crafting Professional Craft  Educator/Designer

Angela Holt


Tuesday, July 1, 2014

Lawn Fawn/Xyron Blog Hop!!


Hello Crafty Peeps!! Angela here. I want to thank you for stopping by my blog to see what fabulous creation I made using the Summertime Charm Stamp Set. I think it turned out pretty cute!!! What is even more fabulous is there is a complete VIDEO TUTORIAL for you to follow my process!!! Woop Woop!! So please visit the link below to my video!!! Be sure to visit all the Designers Links to get inspired with other amazing projects using Lawn Fawn and Xyron Products!!! I dont know where I would be without my Xyron Products!!! Let me know if you have any questions!!!

Visit here to being the blog hop if you have started here!! http://aintshecrafty.blogspot.com/

Or you can visit the Facebook Page at : https://www.facebook.com/xyroninc

Product Used:

Xyron Sticker Maker Max
Xyron Mega Runner
Xyron 1.5 inch Sticker Maker
Lawn Fawn Summertime Charm Stamp Set
Cardstock
Ink
Pattern Paper
Hot Glue


Watch Video Here:


Friday, June 20, 2014

Summer Fun Xyron and Craftwell Blog Hop


Hey Crafty Peeps!!! We are so excited to bring to you the Summer Fun Blog Hop!!! The Xyron Designers and I are showcasing the wonderful embossing folders from Craftwell. Below is a step out tutorial of my up-cycle project.But First if you stopped by here first you will need to visit XYRONS FACEBOOK PAGE AND YOU WILL FIND THE BEGINNING LINK THERE!!! START HERE

Products Used:
Craftwell Embossing Folder Fanciful Flight A4
Xyron  5"Creative Sticker Max
Lindy's Stamp Gang Tres Chic Embossing Powder Chateau Rose
Rhinestone Trim
Pink Ink
Heavy Weight Chipboard
Cream Colored Cardstock
Metal Filagrees
Liquid Glue


 Run through the Xyron Creative Station Max 3 pieces of heavy weight cardstock that measures 2 @ 5 1/2 x 4 inches and the center binding pieces at 1/2 x 5 1/2 inches. Please the adhesive side down on to a piece colored card stock as seen above leaving a gab in between the pieces for easy folding.


 Cover both the inside and outside of the book! Fold the book to help crease the binding!! 


 Cut two pieces of Pattern Paper to place on the inside of the book at 5 1/4 x 3  3/4. Run these through the Xyron Creative Station Max and adhere them inside the books covers. Take a dollar store mini paper pad and mini pin kit and glue them inside the book using liquid adhesive.


 Take the Craftwell Embossing folder and embossing a sheet of paper. ow what I did was cut it down to fit my book and wrapper the book cover showing the butterfly motif int he bottom right corner. I then inked the edges with a rose colored ink.


 I then embossed another piece of paper with the same folder and cut out the butterflies. I then used the Lindys Stamp Gang Embossing Powder and embossed the butter flies. I then glued using liquid glue only the body section down leaving the wings free. I then added a bling trim down the center of the butterflies.

With added finishing touches, I add some metal filagree corners to the top and bottom and drew in the butterfly antennas. I wrapped some ribbon about the book and tied it for closure. See finished design below!!


And there you have it!! A sweet upcycled book that will be perfect for a gift to anyone!!! A Beautiful way to help take notes when needed!! I want to send out thanks you to Xyron and Craftwell for helping me create such beautiful projects. Be sure to check out ALL the wonderful inspiration from the fellow Designers of Xyron!!

Thank you for stopping by

Xyron Designer
Angela Holt
www.angelaholtdesigns.com