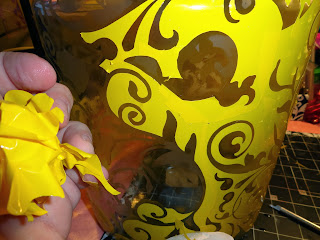
HERE WE GO!!!
First you need to cut out from Etchall's Etchmask ( Yellow Vinyl Paper) your designs. As you can see I cut flourishes using my Silhouette Cameo!Then I grab Etchall's Etchmask Transfer Sheet to prepare the design for transferring onto the jar!
Next, Due to the design being so large I cut it from the Vinyl sheet peeled back the paper on the Transfer sheet and placed it down. Yellow side to sticky side of the Transfer sheet.
Next, I cut around the piece once it was adhered to the transfer sheet!!!Make sure when you cut out the design, you leave at least a 1 inch space all around.
I then used the awesome Etchall Squeegee Tool to make sure there were no bubbles and that the Vinyl made good solid contact to the transfer sheet.
Then, I removed the backing off the design to reveal the sticky side of the vinyl paper. This is the side that you will stick to your project.
Apply with sticky side toward your project the transferred design. Then take you Squeegee Tool and press the design down to make sure there is good contact and no bubbles. THIS IS VERY IMPORTANT step!!! You will not want any Etching Cream Seeping under your designs.
Now it is time to remove the transfer sheet. If you have adhered the design on correctly and firmly, you will have no problem SLOWLY removing the transfer paper!!!
TAAA DAAAA, now you have your image onto your glass project!!
NOW IT IS TIME FOR THE ETCHALL ETCHING CREAM!!!!
With this jar being 14inches tall and 9 and half inched wide. I used the Etchall Etching Cream! For smaller Jars and contains the fabulous tutorial on how to use the "Dip n Etch" can be found by visiting Etchall's Youtube channel!!! "Dip n Etch Tutorial" brought to you by Barbara C. Bosler, CEO of Etchall
Now my whole Jar is covered in design and ready to be Etched.
PLEASE FOLLOW ALL INSTRUCTION ON YOUR ETCHALL BOTTLE SO THAT YOU CAN GET MAXIMUM RESULTS!!!!
Apply the Etching Cream very generously using the Etchall Squeegee Tool. This is such a multitasking little tool!!! You want to do this to ensure a clean and crisp etching!!! Take your time with this step!!!
Following the Steps that are located on the side of your Etchall Bottle, allow this etching cream to set for a total of 15 mins.
REMEMBER YOU CAN SCRAPE THIS CREAM BACK OFF USING YOUR TOOL AND RETURN IT TO THE BOTTLE FOR ANOTHER DAY OF ETCHING!!!
IT CAN BE USED OVER AND OVER AGAIN!!!! woo hoo!!
After that time has lapsed, you will rinse off the remaining etching cream that could not be saved by scraping it off, with warm soapy water. Then you will peel over the yellow vinyl to reveal your work!!!
DRUM ROLL! HERE IS HOW MY PROJECT CAME OUT !!!!
Pretty Dan Fab if I say so myself!!!
Pretty Dan Fab if I say so myself!!!
Created with Admarket's flickrSLiDR.


GREAT tutorial!!!!!
ReplyDeleteGREAT tutorial!!!!!
ReplyDeleteAwesome pictorial Angela !! thanks for the pics, love the upcycling of a plain jar to this gorgeous creation. where did the rose in the lid came from ?
ReplyDeletehttp://www.kalasirjana.blogspot.in/
LOVE IT YOU DO A BEAUTIFUL JOB AS ALL WAYS <3 :)
ReplyDeleteLOVE IT YOU DO A BEAUTIFUL JOB AS ALL WAYS <3 :)
ReplyDelete